What Is a CAD File
A CAD (computer-aided design) file is an output of CAD software like AutoCAD. It is created to store 2D or 3D drawings and models, including information about a designed object, such as a blueprint, technical drawing, schematic, or 3D rendering of an object, and so on. A CAD file can be created in various formats, like DXF, DWG, DWF, etc.
CAD supports creating high-quality drawings, improving productivity and accuracy. Therefore, the CAD file format is often used by designers, engineers, manufacturers, scientists, and digital artists.
A file in CAD format is easy to be shared among professionals and can be opened and edited with a CAD program. However, if you want to share a CAD file with someone who isn’t familiar with CAD, you’d better convert it to a commonly-used file format, like an image format.
How can you convert CAD to image? Below MiniTool PDF Editor provides a step-by-step guide that may help you execute this conversion. Just keep reading.
How to Convert CAD to Image
There are various CAD to image converters in the market that allow you to convert CAD to image. Here, we highly recommend MiniTool PDF Editor to you. It’s a wonderful image converter that enables you to convert images to JPG/PNG/BMP/ICO or from CAD/Word/Excel/PPT.
Additionally, MiniTool PDF Editor can also be used as a PDF editor and PDF converter, offering a wide range of features. For instance, you can use this program to view/edit PDFs, annotate/sign/translate PDFs, rotate/crop/rearrange PDF pages, convert PDF to Word/Excel/PPT/Image/CAD/HTML/EPUB/XPS/Markdown, and vice versa, etc.
To convert CAD formats like DWG to JPG or other image formats with MiniTool PDF Editor, follow the steps below.
Part 1: Download and Install MiniTool PDF Editor
Step 1: Download the MiniTool PDF Editor setup file on your PC by clicking the button below. Keep in mind that this program is available for 32-bit or 64-bit Windows 11/10/8.1/8/7/XP.
MiniTool PDF EditorClick to Download100%Clean & Safe
Step 2: After the download is completed, click the arrow icon next to the downloaded setup file and select Show in folder. Then double-click the specific file in File Explorer to continue.
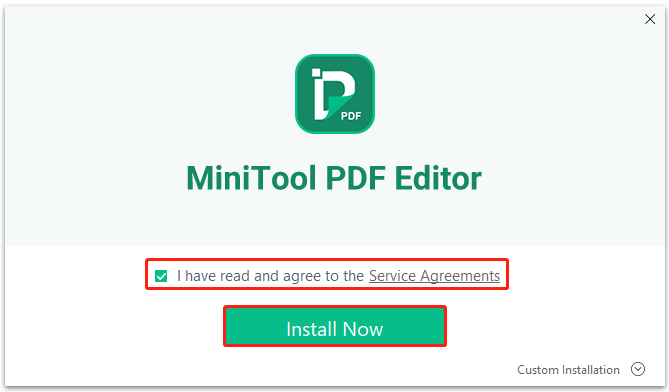
Step 3: Check the I have read and agree to the Service Agreements option and then click Install Now to install this CAD to image converter.
Step 4: Once you install MiniTool PDF Editor successfully, click Start Now to launch this program and enter its main interface.
Part 2: Convert CAD to Image
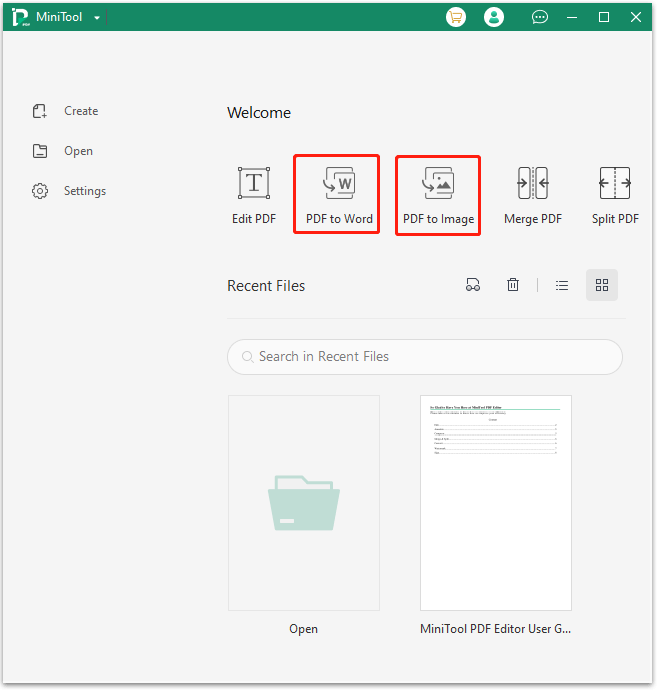
Step 1: In the main interface of MiniTool PDF Editor, click PDF to Word or PDF to Image.
Step 2: In the prompted window, click More Features at the bottom-left corner.
Step 3: After that, navigate to Other Features > CAD to Image.
Step 4: Import the target CAD (in DWG, DWF, or DXF format) file to this converter in one of the following ways:
- Click Add Files, highlight the target file in the pop-up window, and then click Open.
- Click Open or drag files here, find the target CAD file, and then double-click it.
- Drag and drop the CAD file you want to convert to this converting window.

Step 5: After uploading the CAD file, make some changes to the converting settings according to your needs.
- Formats: Select a desired image format from the drop-down menu. MiniTool PDF Editor enables you to convert CAD to PNG/JPG/BMP/TIF.
- Resolutions: Select a suitable resolution option for the converted image. Alternatively, you can select Custom Size and then set the Width and Height manually.
- Output Path: Decide where to save the converted image by choosing Document’s Current Directory, Default Path, or Desktop. Besides, you can click the three dots icon to select another different directory as the output path.
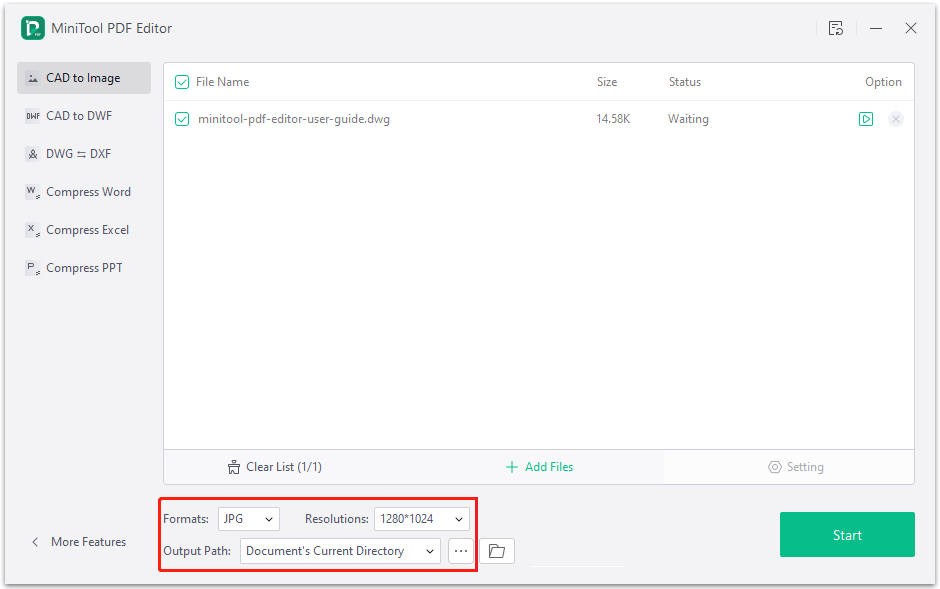
Step 6: Once done, click Start to execute the DWG to JPG (or other CAD to image) conversion.
Click to Tweet: I successfully converted CAD to image with MiniTool PDF Editor by following this post. If you are considering performing such a conversion, I’d like to share this post with you.
Bottom Line
In this post, MiniTool PDF Editor provides a brief introduction to CAD files and a complete guide on how to convert CAD to image. If you plan to perform the CAD to image conversion, you can follow the above guide. If you have any problems with this conversion, you can leave a message in the comment area below.
For any issues related to MiniTool PDF Editor, you can contact us via [email protected]. We’ll help solve your problems as soon as possible.