For some reason, you need to add a CAC signature to PDF. Can you do that in PDF? How to do that? In this post, MiniTool PDF Editor reveals the answers to these questions. You can read on to learn more.
What Is a CAC Signature?
CAC (Common Access Card) signature is an electronic signature using a digital certificate. It is an identity card that contains personal information. CAC signatures are widely used for identity verification in the US military and government agencies.
Nowadays, the use of CAC signatures is no longer limited to military and government agencies. Many companies are also using CAC digital signatures to sign PDF documents.
So, how do you add a CAC signature to a PDF? And what preparations do you need to make before signing? Please continue reading the next section to find out the answers to these questions.
What You Need to Do Before Adding a CAC Signature to a PDF?
Before adding a CAC signature to a PDF, you need to do the following preparations:
- Make sure the CAC card is inserted: You need to correctly insert the CAC card into the card reader of your computer.
- Install the CAC card driver: Make sure your computer has installed the driver for the CAC card so that the system can recognize and access the digital certificate on the card.
- Import the digital certificate: You may need to import the digital certificate in the CAC card into the operating system for easy selection.
Here we will show you how to add a CAC signature to PDF. Let’s dive in!
How to Add a CAC Signature to PDF
There are various PDF tools that allow you to add a CAC signature to a PDF. Below, we have listed 2 of the most common tools. Please keep on reading.
Way 1: Use Adobe Acrobat Pro DC
Adobe Acrobat Pro DC is a professional PDF editing and management software developed by Adobe. It provides comprehensive PDF creation, editing, conversion, signing, and protection functions. It is widely used on various occasions such as individuals and enterprises to help users efficiently process PDF files.
Adobe Acrobat Pro DC can also securely sign and certify documents using CAC digital signatures. Here are the detailed steps:
Step 1: Open Adobe Acrobat Pro DC and go to the home page, then open the PDF you want to sign with CAC signature.
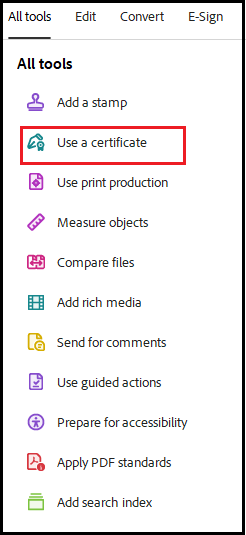
Step 2: Click All tools and select Use a certificate to open.

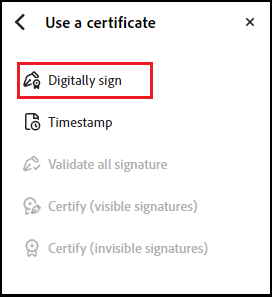
Step 3: Click Digitally sign under the Use a certificate section.

Step 4: Select the area of the PDF where you want to add the CAC signature.
Step 5: A prompt "Digital ID Configuration Required" will appear and ask you to configure your digital ID. You need to click the Configure Digital ID button to continue.
Step 6: Select one of the following three types of digital IDs to configure your digital ID. Then click Continue.
- Use a Signature Creation Device
- Use a Digital ID from a file
- Create a new Digital ID
Step 7: Follow the prompts to complete the steps to add a CAC signature to PDF.
Way 2: Use WPS Office
WPS Office is a comprehensive, easy-to-use and lightweight office software that provides document, spreadsheet, presentation and PDF functions. It is suitable for users of different platforms, including Windows, Mac, Linux, Android and iOS operating systems.
Below are the detailed steps on how to add a CAC signature to PDF using WPS Office.
Step 1: Open a PDF file that you want to sign a CAC signature in WPS.
Step 2: Click on the Fill & Sign tool from the right side toolbar, and then Sign > Create signature.
Step 3: In the PDF signature interface, you can choose an image, text, or another option to sign. Click OK.
Bottom Line
For some reason, you need to add a CAC signature to a PDF. This post introduces 2 ways for you. Hope this article is helpful.
In addition to the well-known Adobe Acrobat PDF Editor introduced above, here is another editor recommended to you - MiniTool PDF Editor.
It is a comprehensive PDF editing tool for Windows PC. It allows you to create PDF, hyper compress PDF, merge images into PDF, and convert PDF to Word/Excel/PPT/CAD and other formats.

