Microsoft Print to PDF is a feature in Windows 10/11 that allows you to print documents, and images to PDF without using third-party software. However, some people encounter the Microsoft Print to PDF missing problem.
Well, how to fix this problem? Read the content below to know the answer.
Way 1: Check Windows Features
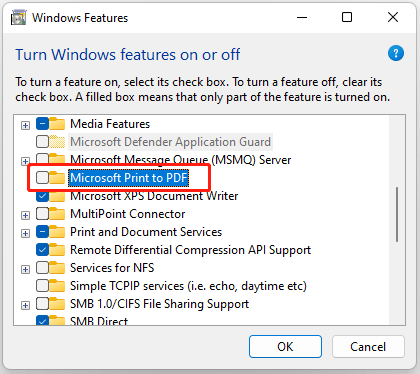
If Print to PDF is missing on your Windows 11/10 computer, you need to check the Windows Features panel first. Since it's an optional feature, you'll get this error if you remove it by mistake. To do this, do the following:
Step 1: Type Windows features in the Search box. Then click on Turn Windows features on or off.
Step 2: In the pop-up box, find and check the Microsoft Print to PDF box.
Step 3: Click on the OK button. Then it will start to install the feature.

Way 2: Add Print to PDF Manually
If the Microsoft Print to PDF not showing problem still appears, you should add Print to PDF manually. To do this, you can follow the steps below:
Step 1: Press Win + I key to open Settings.
Step 2: Navigate to Bluetooth & devices > Printers & Scanners.
Step 3: Click on the Add devices button. Then click on the Add manually option.
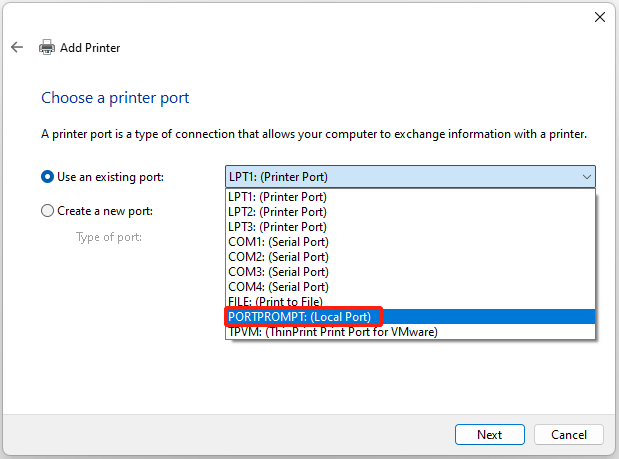
Step 4: In the next window, choose the Add a local printer or network printer with manual settings option and click Next.
Step 5: Then choose Use an existing port and then click the drop-down menu to choose PORTPROMPT: (Local Port) and click Next.

Step 6: In the Install the printer driver page, choose Microsoft under Manufacture part and choose Microsoft Print to PDF under the Printers part. Then click on Next.
Once done, you can check if the Microsoft Print to PDF missing problem gets fixed.
Way 3: Remove the Print to PDF Driver and Reinstall
Sometimes, the corresponding driver can cause problems. So, you need to remove the Print to PDF driver from your computer and reinstall it.
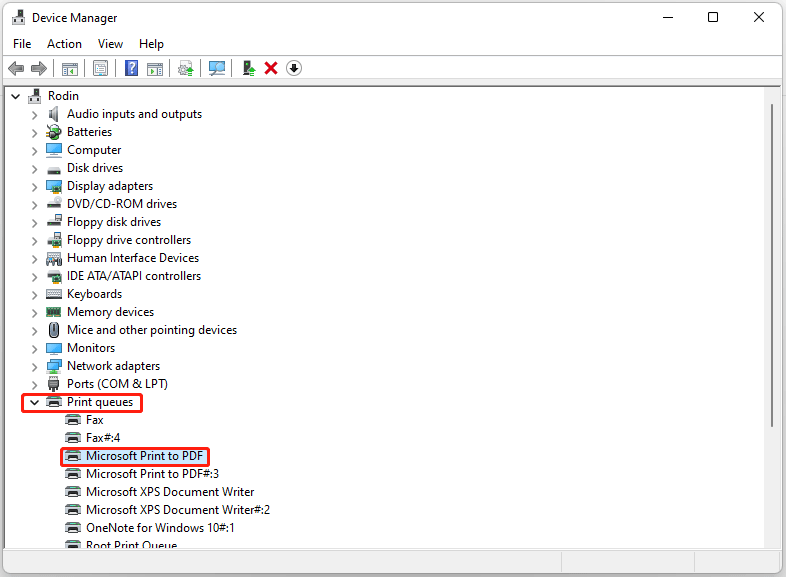
Step 1: Press the Win + X key and then select Device Manager.
Step 2: Expand the Print queues list and right-click on the Microsoft Print to PDF option. Then choose Uninstall device.

Step 3: After that, you can install the Microsoft Print to PDF driver again.
Way 4: Reinstall Microsoft Print to PDF via PowerShell
If the above methods can’t solve the Microsoft Print to PDF not showing problem, you can try to reinstall Microsoft Print to PDF via PowerShell. Here is the tutorial.
Step 1: Press the Win + X key and select Windows Terminal (Admin) option.
Step 2: Type the following command and press Enter after each one:
- Disable-WindowsOptionalFeature -online -FeatureName Printing-PrintToPDFServices-Features
- Enable-WindowsOptionalFeature -online -FeatureName Printing-PrintToPDFServices-Features
Once done, restart your computer and check if the error gets fixed.
After you successfully print documents, and images to PDF, you may need a professional PDF editor to manage a PDF file. Here MiniTool PDF Editor is highly recommended. It is an all-in-one PDF editor that is embedded with almost all the functions like converting, merging, splitting, compressing, password-protecting PDFs, and so on.
MiniTool PDF EditorClick to Download100%Clean & Safe
Bottom Line
This post provides 4 ways for the Microsoft Print to PDF missing problem. If you have other ways for it, you can share them with us in the following comment zone.

![How to Fix PDF Preview Handler Not Working [4 Ways]](https://images.minitool.com/pdf.minitool.com/images/uploads/2023/05/pdf-preview-handler-not-working-thumbnail.png)