In this post, MiniTool PDF Editor defines the PDF owner password, collects the distinction from the user password, reveals its main features, summarizes its importance, and shows the steps to add/remove it.
Encrypting PDFs is a common way to protect PDFs, which is preferred by lots of users. There are 4 main encryption methods, including password-based encryption, certificate-based encryption, AES (Advanced Encryption Standard), and RC4.
Among these methods, password-based encryption is the most commonly used one. In this post, I focus on the PDF owner password, explaining its purpose, features, and key details.
PDF Password Types
What Is the PDF Owner Password
Depending on the PDF reader or writer you use, the PDF owner password can be referred to as the PDF permissions password, restriction password, or master password. Besides, it is known as the change permissions password in Adobe Acrobat.
With this password, you can edit, modify, print, copy, extract data, and comment in a PDF file. In a word, you have full access to the PDF if you have the PDF owner password. If you don’t have an owner password, you can’t make changes within the PDF.
What Is the PDF User Password
User password, also known as open password, allows you to view the PDF file if you enter the correct password. However, it doesn’t allow you to make changes within the PDF document. It’s worth noting that the user password prevents unauthorized users from opening a PDF.
Owner Password vs User Password
The user password restricts who can open the PDF, while the owner password controls editing, printing, and copying permissions. If only an owner password is set to the PDF, you can open the file even if you don’t have the password. However, you are unable to edit, print, or copy the PDF.
If a user password is added, the file can’t be opened without entering the password.
The table below lists common differences between the user password and owner password.
| Features | PDF Owner Password | PDF User Password |
| Purpose | To control permissions like editing, printing, and copying | To prevent unauthorized access |
| Default Access | Allows users to view PDFs but prevents them from making modifications | Restricts users from accessing PDFs entirely |
| Common Use Cases | Sharing reports, e-books, or forms where reading is allowed but editing is prevented | Sharing confidential files safely & preventing unauthorized access |
Owner password vs user password: which to pick?
If you just want to prevent others from accessing the file, you should add a user password. If you share the PDF with others but don’t want to grant them other permissions, you need to set up an owner password.
If necessary, you can add both the user password and owner password on a single PDF simultaneously. To open such a PDF, you can use either of the passwords. Nevertheless, you have to use the owner password to further modify the file or print it.
What Does the PDF Owner Password Do
Before you add an owner password for your PDF, you should know what it does. PDF files protected by the owner password restrict some file permissions. When you open the encrypted PDF, you will see a notification at the top of the file: “This file has limited permissions. You may not have access to some features.”.
You can click the View permissions link to check the specific prohibited permissions. As the picture below shows, you are restricted to comment, copy content, edit file content, fill form fields, print, and sign an owner password-protected PDF.
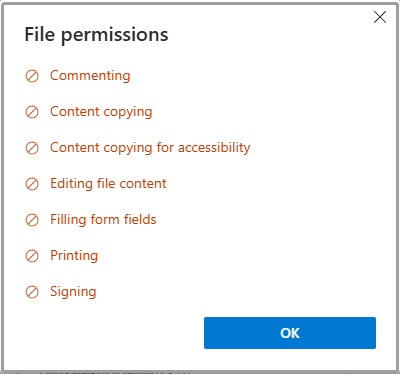
Starting from the latest PDF version, PDFs with an owner password have the following restrictions.
- Printing: You can’t print the PDF no matter in low resolution or high resolution.
- Editing: You can’t edit text, images, and annotations on the PDF. For instance, you are not allowed to add, delete, or modify text and images.
- Commenting: You can’t make comments on the PDF.
- Signing: You can’t add signatures to the PDF.
- Content copying: You are unable to copy the content of the PDF.
- Content copying for accessibility: You can’t copy the PDF’s content for accessibility, which is useful for avoiding plagiarism.
- Document assembly: Also known as document automation, which refers to the process of automatically generating documents from templates. If the owner password is set, the PDF won’t generate files by automation.
- Filling form fields: You are not allowed to fill form fields.
- Changing the document: You can’t modify the PDF file randomly.
- Page and graphics extraction: You can’t extract pages and graphics from the PDF.
- Creating template pages: You are not allowed to create template pages.
Further reading:
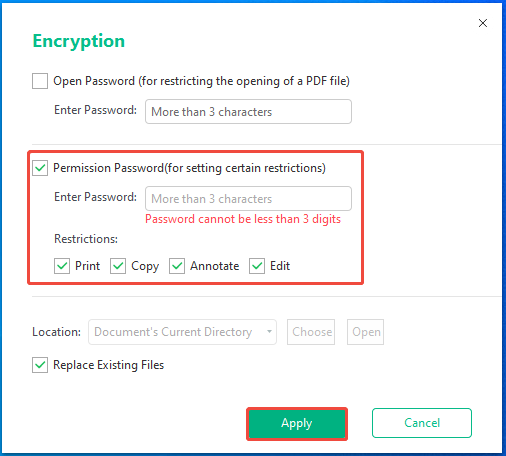
According to your needs, you can allow some permissions while blocking others. For instance, if you want to distribute a PDF but avoid duplicating the content, you can enable the Print option but disable Copy.
If you don’t want other people to edit the PDF except annotating, tick the Edit option and uncheck the Annotate option while setting up the owner password.
Why Do You Need an Owner Password
The PDF owner password is vital for PDF security and management, allowing the file owner to have full control over the PDF. That’s why you need to set up an owner password to the PDF. The detailed reasons are listed as follows.
- Manage PDF permissions: Limit who can edit, print, or copy content on the PDF.
- Protect intellectual property: Protect eBooks, contracts, and other valuable documents from unauthorized copying and distribution.
- Avoid unauthorized changes: Make sure that only authorized individuals can change the PDF file.
- Maintain the integrity of the PDF: Prevent accidental or malicious changes to the content of the PDF.
How to Add a PDF Owner Password
To add an owner password to the PDF, you need to use a PDF editor. Here, I show you how to add the PDF owner password via 2 popular PDF editors. If you also plan to encrypt your PDF, you can refer to the following methods.
Method 1: Use MiniTool PDF Editor
MiniTool PDF Editor is a reliable PDF encryptor, which can password protect PDFs effectively.
It allows you to set up both the user password and owner password. Moreover, it enables you to choose restrictions you want to set to the PDF.
More importantly, it is capable of encrypting PDFs in batch, improving work efficiency and saving time. If you want to encrypt multiple PDFs at once, try using MiniTool PDF Editor.
Download and install MiniTool PDF Editor on your computer. After that, launch it and follow the steps below to encrypt your PDF.
MiniTool PDF EditorClick to Download100%Clean & Safe
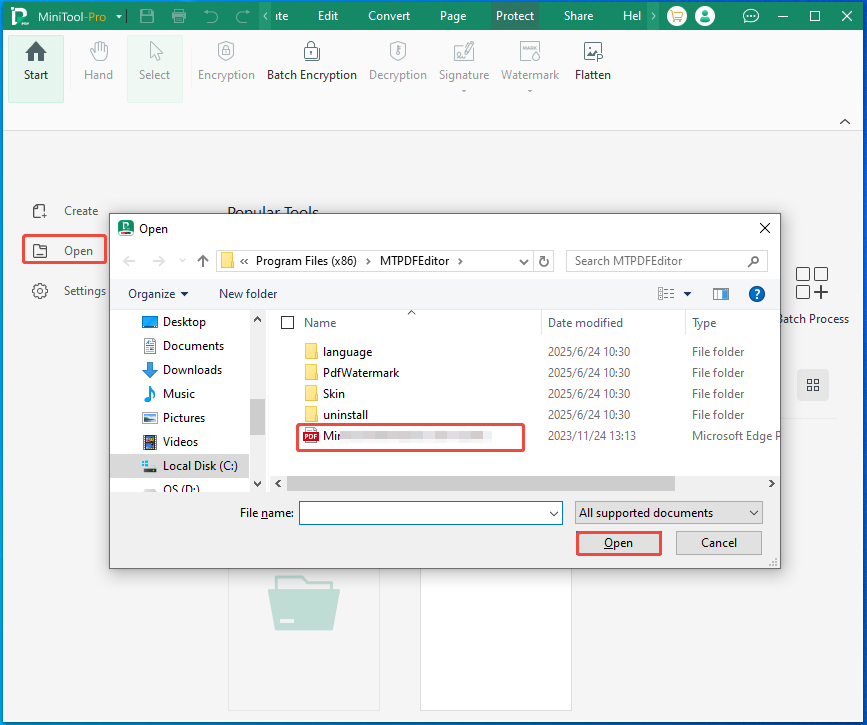
Step 1: Open the PDF to encrypt with MiniTool PDF Editor.
- Click on the Open option in the left pane.
- Locate the target PDF in the pop-up window.
- Click on that PDF and hit the Open button.
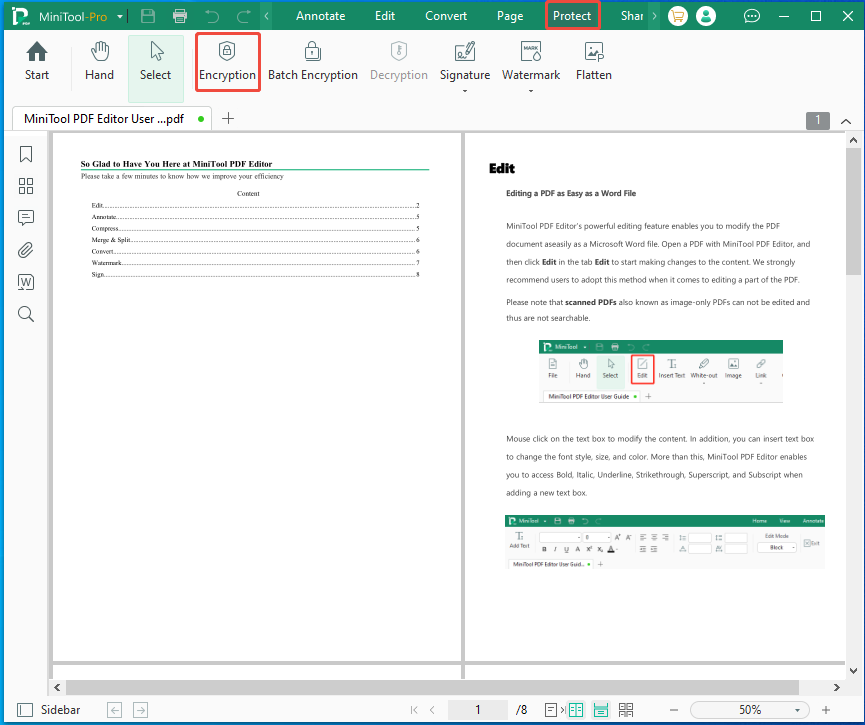
Step 2: Tap on the Protect tab and click Encryption.
Step 3: In the prompted window, set up the password and carry out the operation.
- Tick Permission Password (for setting certain restrictions). (Tip: If you want to add a user password, tick the Open Password option and enter a password more than 3 digits.)
- Enter a strong and long password in the corresponding field.
- Tick the checkbox in front of options like Print, Copy, Annotate, and Edit.
- Choose a location for the encrypted file.
- Tap the Apply button.
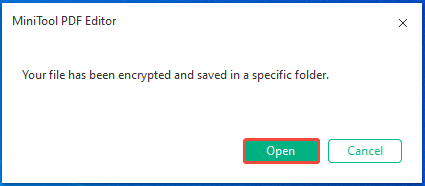
Step 4: Once done, you will receive the “Your file has been encrypted and saved in a specific folder” message.
As a feature-rich tool, MiniTool PDF Editor boasts dozens of other features, such as creating, viewing, editing, converting, annotating, protecting, and sharing PDFs. You can manage your PDFs effectively with this software.
Get this free PDF editor installed on your computer now and use the given features to manage PDFs.
MiniTool PDF EditorClick to Download100%Clean & Safe
Method 2: Use Adobe Acrobat
Adobe Acrobat is an overwhelming PDF editor, allowing you perform various tasks on PDFs. For instance, you can create, view, edit, annotate, print, and manage PDFs. Also, you can use it to set up the owner password PDF.
Here are the steps for you.
Step 1: Run Adobe Acrobat and open the target PDF in it.
Step 2: From the global bar in the upper left corner, click All tools > Protect a PDF > Encrypt with Password.
Step 3: If a prompt appears, click Yes to continue.
Step 4: In the Permissions window, choose Restrict editing and printing of the document and input a password in the “Change Permissions Passwords” field.
Step 5: Decide what the user can print from the Printing allowed menu.
Step 6: Pick what the user can modify from the Changes allowed menu.
Step 7: Follow the on-screen instructions to complete the operation.
Try using Adobe Acrobat alternatives if you are stuck on errors like Adobe Acrobat an internal error occurred, a drawing error occurred, a number is out of range PDF, etc.
How to Remove Owner Password from PDF
An owner password can be removed by commonly available software or applications and even some free online services. Here, I show you how to remove the owner password from PDFs in 2 cases.
Case 1: You Have the Password
If you have the owner password or use a PDF password remover, it is easy to remove the owner password from a PDF.
Therefore, you need to pick a reliable PDF password remover. Here’s how to remove the password and clear permission settings via MiniTool PDF Editor.
MiniTool PDF EditorClick to Download100%Clean & Safe
Step 1: Open the password-protected PDF with MiniTool PDF Editor.
Step 2: Click on Permission Removal and click Apply in the prompted window.
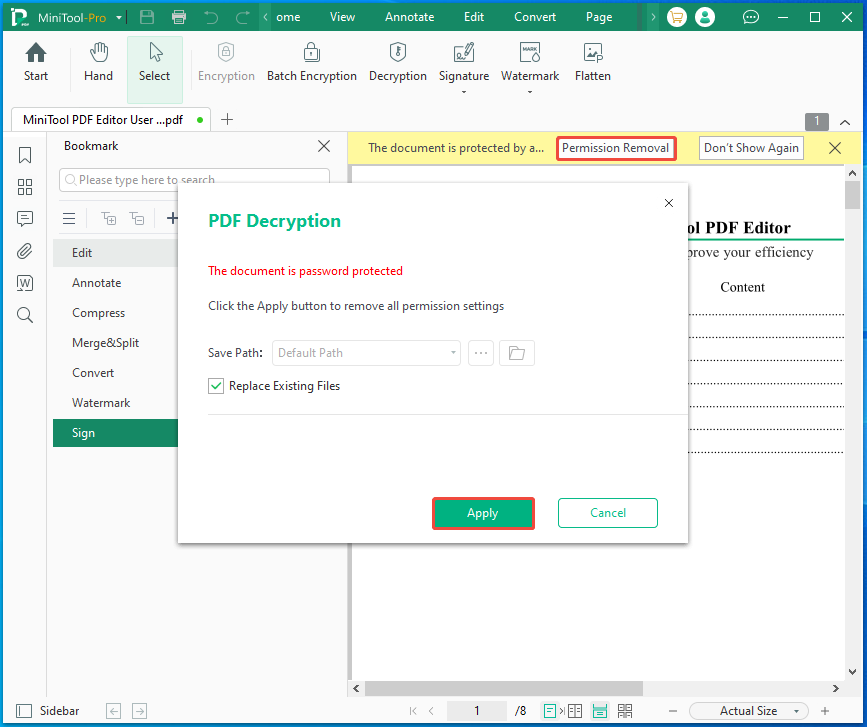
Step 3: After a while, the file will be encrypted.
Case 2: You Don’t Have the Password
If you don’t have the password or forget it, you can’t remove the password. In this case, you can contact the creator or owner of the PDF and request the password or permission if possible.
Bottom Line
This post focuses on the PDF owner password, including its basic information, main functions, importance, setup, and removal. I hope it will be useful in protecting PDF files.
If you encounter any issues while using MiniTool PDF Editor, contact us by sending an email via [email protected]. We will get back to you as soon as possible.
PDF Owner Password FAQ
1. Open the PDF in a PDF editor.
2. Right-click the PDF and pick Document Properties on the context menu.
3. In the Properties window, delete details like author, subject, keywords, etc.
1. Open Google Drive and access its Settings by clicking the cog icon.
2. Locate and tick the Convert uploads to Google Docs editor format option.
3. Return to the home screen of Google Drive and select New > File upload.
4. Upload the PDF to Google Drive.
5. Right-click the uploaded file and choose Open with > Google Docs.
6. Select File, hover over Download, and hit Microsoft Word on the sub-menu.
7. Edit the file in Microsoft Word and save it to PDF.
